A Step-by-Step Clinical Overview
A torn, stretched, or damaged earlobe may seem like a minor issue—but it can significantly impact facial aesthetics and confidence. – Fortunately, earlobe repair (lobuloplasty) is a quick, minimally invasive procedure that restores the earlobe’s natural shape with precision and minimal downtime.
If you’re considering this treatment, understanding the step-by-step clinical process can help you feel more confident and informed.
Step 1: Consultation & Clinical Assessment
The procedure begins with a detailed consultation.
- The doctor evaluates the extent of damage (tear, stretch, or deformity)
- Reviews your medical history and expectations
- Plans the repair technique for natural symmetry
This step ensures a customized approach tailored to your earlobe condition.
Step 2: Marking the Treatment Area
Before starting, the surgeon carefully marks the earlobe.
- Defines the incision line and final shape
- Ensures balanced and symmetrical correction
- Helps achieve a natural aesthetic outcome
Precision marking is key to minimizing visible scarring.
Step 3: Local Anaesthesia for Comfort
The earlobe repair procedure is performed under local anaesthesia, ensuring a painless experience.
- A small injection is given to numb the earlobe
- You remain awake and comfortable
- Only a slight pinch is felt initially
You won’t feel pain during the procedure, making it safe and stress-free.
Step 4: Removal of Damaged Tissue
Once the area is numb, the surgeon begins the repair process.
- Scarred or stretched tissue is carefully removed
- The edges are reshaped to create a fresh surface for healing
- Ensures the final result looks smooth and natural
This step is crucial for long-lasting and aesthetically pleasing results.
Step 5: Tissue Realignment & Suturing
After removing damaged tissue, the earlobe is reconstructed.
- The skin edges are precisely aligned
- Fine sutures are used to close the incision
- Techniques ensure minimal tension and reduced scarring
The goal is to restore the earlobe’s original contour and structure.
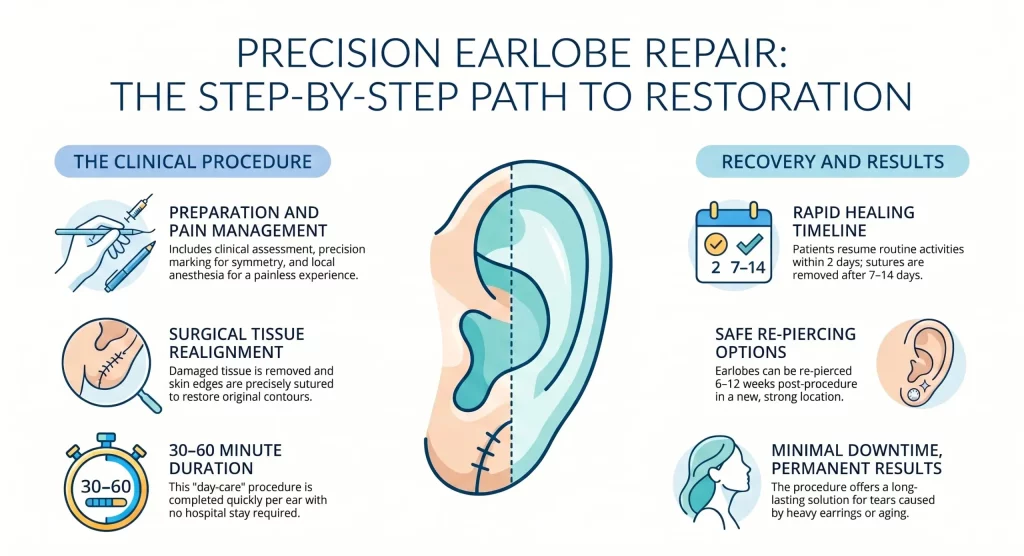
Step 6: Quick Procedure Duration
Earlobe repair is a fast outpatient procedure.
- Typically completed in 30–60 minutes per ear
- No hospital stay required
- Patients can usually go home the same day
It’s often referred to as a “day-care cosmetic procedure”.
Step 7: Recovery & Healing
Recovery is simple and quick, with minimal disruption to daily life.
- Mild swelling or discomfort may occur
- Most people resume routine activities within 1–2 days
- Sutures are usually removed in 7–14 days
Proper aftercare ensures smooth healing and minimal scarring.
Step 8: Re-Piercing (Optional)
If you wish to wear earrings again:
- Re-piercing is usually recommended after 6–12 weeks
- A new piercing is done slightly away from the original site
- Ensures the repaired tissue remains strong and intact
This allows you to enjoy earrings again without risking re-tear.
Why This Procedure Is Popular
Earlobe repair is widely preferred because it offers:
- Quick and minimally invasive correction
- Natural-looking results
- Minimal downtime
- Permanent restoration of earlobe shape
It’s an ideal solution for damage caused by heavy earrings, accidental tears, or ageing-related stretching.
What This Means for Your Confidence
Earlobe repair isn’t just a cosmetic fix—it’s a confidence-restoring procedure. Restoring symmetry and appearance, it helps individuals feel more comfortable and confident in their look.
For those considering expert care, treatments at Dr Sajjas Clinic are designed with precision, safety, and natural aesthetics in mind—ensuring results that look and feel completely natural.